
Open-source Shopify AI Tools
built entirely with python.
ecommerce is already difficult af, these projects are open-source to help make things a little easier.
Documentation
Video Guide
Skip the docs, watch the video.
Getting Started
Guides: Youtube
API Credentials
Python Requirements
Initialize
Clone Project
Git: https://github.com/DaveedValencia/openshopgpt
Clone the repository into your local environment.
Update Credential Templates
Path: openshopgpt > creds > filename.json
update “_shop.json” and “_klaviyo.json” to include your prefix to each account.
You should end up with the following files assuming your prefix is “d1”.
Client Specific API:
- d1_shop.json
- d1_klaviyo.json
Globally Shared API:
- ga_creds.json
OpenAI API is entered later on into a secrets file.
Create Tables
Path: openshopgpt > scripts > create_tables.py
Update ‘clients’ variable to equal a two letter name for each client that will be onboarded.
clients = [“d1″,”d2″,”d3”]
Run create_tables.py to create all the necessary tables.
GA4 Configuration
Folder: openshopgpt > scripts > ga_main.py
Update “clients” variable to match the accounts that you will update.
‘client_ids’ variable is a dictionary where the account prefix is equal to the GA4 property id.
‘start_date’ is equal to the date to start importing analytics data. Shoppi only supports GA4. Universal Analytics (UA) is not supported.
‘end_date’ this is the cut off date, for this agent purposes, this date will always be set in the future.
Adjust these variables to your use case.
Klaviyo Metric ID
Folder: openshopgpt > scripts > klaviyo_get_metric_id.py
Update ‘client‘ variable to match ONE client account prefix. You must do this individually for each client.
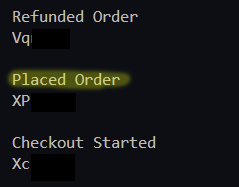
Run klaviyo_get_metric_id.py and it will print out Shopify metrics with their relevant ID’s.
Find the metric ID for “Placed Order” and copy it.
Go to creds > client_id_klaviyo.json and add the metric ID into the ‘conversion_metric‘ variable in the json file.
Load Data
ga_main.py
Path: openshopgpt > scripts > ga_main.py
You will run this file once for new account set up and then daily for ongoing accounts.
Run this file each time new account is added to the database. The ‘clients‘ variable should only be new account prefixes.
Run this file everyday for all clients. ‘clients‘ variable should include all client accounts in the database. Change the ‘start_date‘ to be the last 30 days and the ‘end_date‘ to a future date.
klaviyo_main.py
Path: openshopgpt > scripts > klaviyo_main.py
You will run this file once for new account set up and then daily for ongoing accounts.
Run this file each time new account is added to the database. The ‘clients‘ variable should only be new account prefixes.
Run this file everyday for all clients. ‘clients‘ variable should include all client accounts in the database.
When you run this on new accounts, make sure the date (highlighted below) is set to one year minimum.
When you run daily, update the date to the last month.

shopify_main.py
Path: openshopgpt > scripts > shopify_main.py
Date starts and date ends should be adjusted for new accounts vs updating existing accounts.
When you run this file for the first time, you want a wide date range. I recommend loading the last two years to start. You should only target new accounts for the first load.
Run this everyday with ‘clients’ including all account prefixes in the database.
Change the query_start to yesterday’s date and query_end to today’s date. When you run this everyday, it adds yesterdays orders but does not add todays data.
API Version: 2024-07
As of this release, this was the most recent supported version for the Shopify Python Library.
OpenAI
Assistant Creation
Folder: openshopgpt > prompts
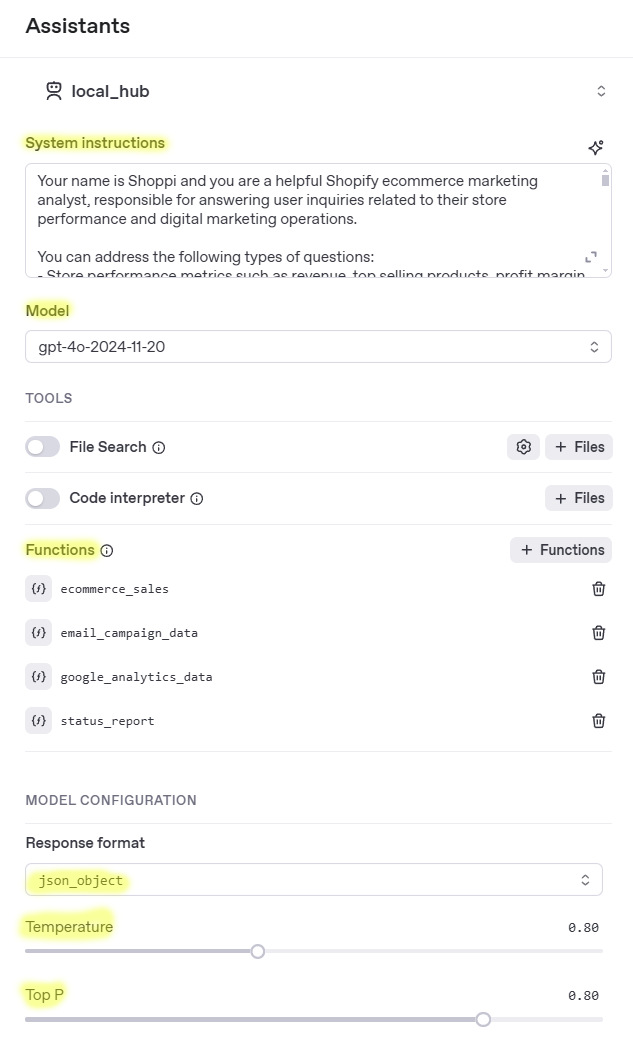
Create an OpenAI assistant to match the screen shot below.
- System Instructions > “local_hub.txt“
- Model – Choose any
- Functions
- ecommerce_sales.json
- email_campaign_data.json
- google_analytics_data.json
- status_report.json
- Response format = ‘json_object‘
- Temperature = 0.80
- Top P = 0.80
Streamlit - Configuration
Secrets Management
Path: openshopgpt > shoppi > .streamlit > secrets.toml
Update these variables with your OpenAI API credentials.
mods.py
Path: openshopgpt > shoppi > mods.py
Towards the top of the file there is a variable named ‘open_model‘ this is the OpenAI model that will be used in all function calls. You can update this with the name of any official OpenAI model.

shop_gpt.py
Path: openshopgpt > shoppi > shop_gpt.py
Choose the account you want to access and set it in “USER_PREFIX“.
You can only access one account at a time.

Run Shoppi
Activate
Run:
openshopgpt > shoppi > python -m streamlit run shop_gpt.py